
How To Make A Rocky Road Cake || Gwendolyne
Wednesday, January 10, 2018
Hello Everyone!
First of all, and no I'm not that late it's only the second week of January, I want to wish you all a very very happy new year! May 2018 be a year full of joy and love and that you can achieve as many goals as you wishes.
Then the next thing, I want to say that I know I have been absent for quite a long time and I apologize but school and work and social life and travelling and other things have been keeping my life really busy so I couldn't make time to write down some articles. I also went through my little written-already-articles storage so I couldn't post anything even if I had the time. And u know, sometimes I just don't feel like writing stuff and writersblocks are still a great issue for me without knowing how to solve anytime soon.
But enough about me and my problems, you probably clicked on continue reading because you saw the title and u were craving to this, so let me tell you very quick how you can make your very own rocky road cake!

What better way to start 2018, then with something sweet. Two years ago, I posted an article where I made rocky road. Very simple and delicious, but I think it's time to upgrade ourselves. That's why I'm going to share this recipe with y'all. A chocolate cake with chocolate chunks and topped with biscuits, melted chocolate and marshmallows.
Shall we begin? :)

Ingredients:
(To bake the cake)
♦ 180 gram salted butter ♦
♦ 200 gram sugar (brown sugar is prefered) ♦
♦ 1 egg ♦
♦ 1 teaspoon of vanilla extract (5 mL) ♦
♦ 165 gram flour (self-raising is prefered) ♦
♦ 50 gram cocoa powder ♦
♦ 1 teaspoon of baking soda (5 gram) ♦
♦ 240 gram dark chocolate chunks or chips ♦

(The Toppings)
♦ 50 gram milk chocolate (chunks/chips/chopped) ♦
♦ Chopped biscuits ♦
♦ Marshmallows ♦

Let's start baking!
Step 1) Preheat oven -> 175 ℃
 Step 2) Prepare a cakepan and place parchment paper in it to avoid stickiness. Or use, like in this picture, butter to make sure the cake pan becomes non stick. Make sure to cover the whole pan!

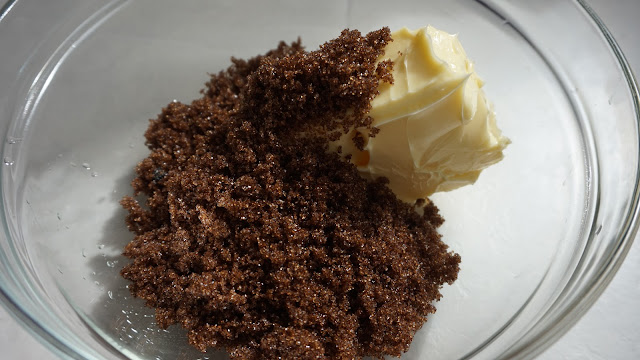
 Step 3) Get a big bowl and add butter and the sugar in it. Cream it together with a electric mixer (A non-eletric mixer is also fine but a bit tiring) untill it's light and fluffy, which will take about 3 to 4 minutes before it will become like the picture here above.

 Step 4) Mix in the egg and vanilla extract to the mixture, again with the mixer.


 Step 5) Add in the flour, the cocoa powder and the baking soda and mix it untill it becomes a dough texture, the mixture should be thick.


 Step 6) Now get the dark chocolate chunks en add it to the mixture. Stir untill the chunks are equally spread out in the dough. (It's not necessary to buy chocolate chips or chunks. You can also break a chocolate bar into little pieces, as long as it's small!)


 Step 10) To make it ready to serve as a real rocky road cake, simply add cookies and chocolate chunks on the cake and then cover it with marshmallows.
Now put the cake back in the oven but now we are not going to bake it but grill it so the marshmallows can get crispy and the chocolate can melt. Make sure the grill is on it's highest setting and grill the cake for 2 minutes.


And voila, your cake is ready to be eaten. It has a nice flavour and it looks creative but it's actually really easy to make. Mine got a bit too sweet tho, so you can reduce the amount of sugar for the people that doesn't like their cakes to be too sweet but other than that I love this cake. As you may see the cake isn't really solid but that is because it's still warm and the chocolate chunks as topping has melted on the cake, so double as much chocolate! The melted chocolate makes the lack of solidness up right?
TIP : really great cake to be serve after dinner or at a high tea.
Bon appetit!
- Gwendolyne
[written on 2018.10.01]
First of all, and no I'm not that late it's only the second week of January, I want to wish you all a very very happy new year! May 2018 be a year full of joy and love and that you can achieve as many goals as you wishes.
Then the next thing, I want to say that I know I have been absent for quite a long time and I apologize but school and work and social life and travelling and other things have been keeping my life really busy so I couldn't make time to write down some articles. I also went through my little written-already-articles storage so I couldn't post anything even if I had the time. And u know, sometimes I just don't feel like writing stuff and writersblocks are still a great issue for me without knowing how to solve anytime soon.
But enough about me and my problems, you probably clicked on continue reading because you saw the title and u were craving to this, so let me tell you very quick how you can make your very own rocky road cake!

What better way to start 2018, then with something sweet. Two years ago, I posted an article where I made rocky road. Very simple and delicious, but I think it's time to upgrade ourselves. That's why I'm going to share this recipe with y'all. A chocolate cake with chocolate chunks and topped with biscuits, melted chocolate and marshmallows.
Shall we begin? :)

Ingredients:
(To bake the cake)
♦ 180 gram salted butter ♦
♦ 200 gram sugar (brown sugar is prefered) ♦
♦ 1 egg ♦
♦ 1 teaspoon of vanilla extract (5 mL) ♦
♦ 165 gram flour (self-raising is prefered) ♦
♦ 50 gram cocoa powder ♦
♦ 1 teaspoon of baking soda (5 gram) ♦
♦ 240 gram dark chocolate chunks or chips ♦

(The Toppings)
♦ 50 gram milk chocolate (chunks/chips/chopped) ♦
♦ Chopped biscuits ♦
♦ Marshmallows ♦

Let's start baking!
Step 1) Preheat oven -> 175 ℃


Step 7) Now it's time to spread the dough in the cake pan. There are two options for this:
1 - You use spread all the dough in once in the cake pan (evenly!) en put it in the oven to bake.
OR
2 - You spread half of the dough in the cake pan and then add a layer of marshmallows en then cover the marshmallows the other half of the dough. This is a bit complicated and I did not try it out so I do not know if it works but you can try. You can use marshmallow fluff or just put solid marshmallows in it and let it melt in the oven. But I do not know if this works, because I think the marshmallows will melt to much due to the time that it requires to bake the cake and then the layer will melt down on the bottom half of the cake, which will ruin it. But it can also be possible that your cake pan is very solid and the pressure is really high so the marshmallows can't melt down. Let me know if you succeed!
Because as you may see, I used the first option. And the biggest reason for it that I didn't want to riske the cake and I didn't had enough marshmallows, :)


Step 8) Time to put your masterpiece in the oven to bake for 30 minutes. Make sure to check on the cake multiple times because every oven is different, so the baking time may variate. As you may see in the picture, there is a hole in the center. That is because I used a chopstick and poke in the cake to see if it was baked. If there isn't mixture hanging on the chopstick, then you know the cake is ready!
Step 9) After getting it out of the oven, let it cool for about an hour and a half. Don't put it in the refridgerator so it can still be a bit warm. If you do put it in the fridge it will probably take less time but even the inside will get hard.
First the center may look like the it is not ready and is still raw but it will eventually rise up at the time you let it cool.
To check if it's ready, carefully remove your cake pan a bit. If the cake doesn't come up with it, you know it cools down good. The cake is now ready to serve as a chocolate cake but it's not a rocky road cake yet. We are going to do something about that.


Now put the cake back in the oven but now we are not going to bake it but grill it so the marshmallows can get crispy and the chocolate can melt. Make sure the grill is on it's highest setting and grill the cake for 2 minutes.


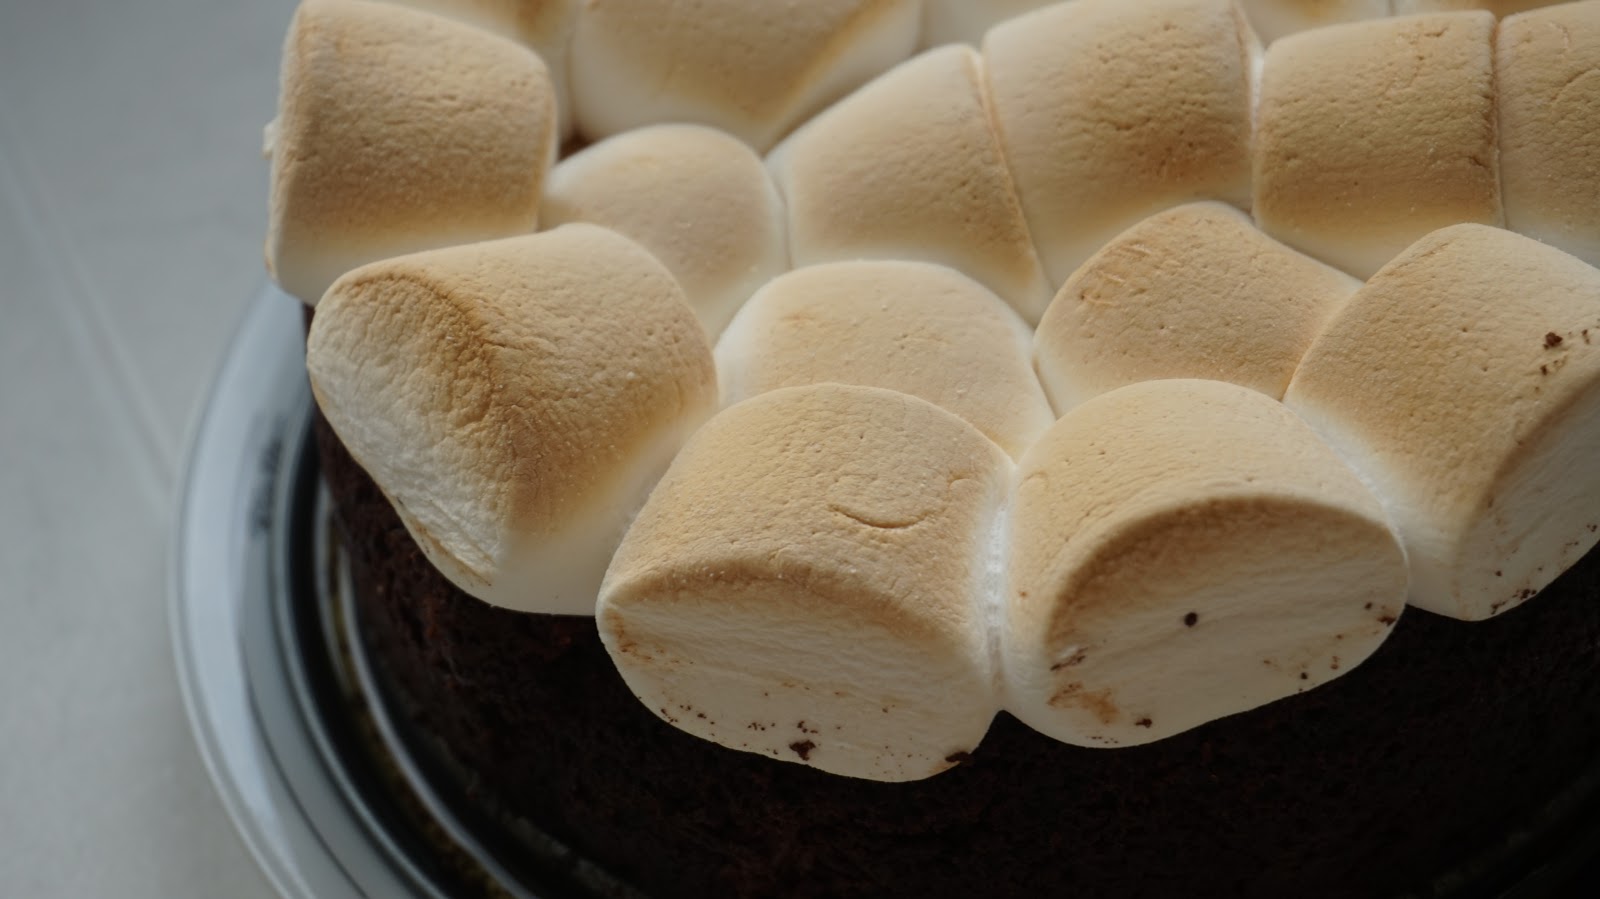


And voila, your cake is ready to be eaten. It has a nice flavour and it looks creative but it's actually really easy to make. Mine got a bit too sweet tho, so you can reduce the amount of sugar for the people that doesn't like their cakes to be too sweet but other than that I love this cake. As you may see the cake isn't really solid but that is because it's still warm and the chocolate chunks as topping has melted on the cake, so double as much chocolate! The melted chocolate makes the lack of solidness up right?
TIP : really great cake to be serve after dinner or at a high tea.
Bon appetit!
- Gwendolyne
[written on 2018.10.01]


0 reacties